WordPress is the world's most popular content management system, and installing it is far easier than it looks. In this guide I'll walk you through how to install WordPress on a hosting account manually, step by step from scratch: uploading the files, creating a database in cPanel, configuring it, and the famous "5-minute install." If you run into an error during installation, you can use the WordPress installation errors guide I'll link to at the end.
Before You Start: What Do You Need?
- A hosting account with cPanel access.
- A domain name pointed to your hosting.
- FTP access (or the cPanel File Manager).
- The latest WordPress package downloaded from wordpress.org.
The General Installation Flow
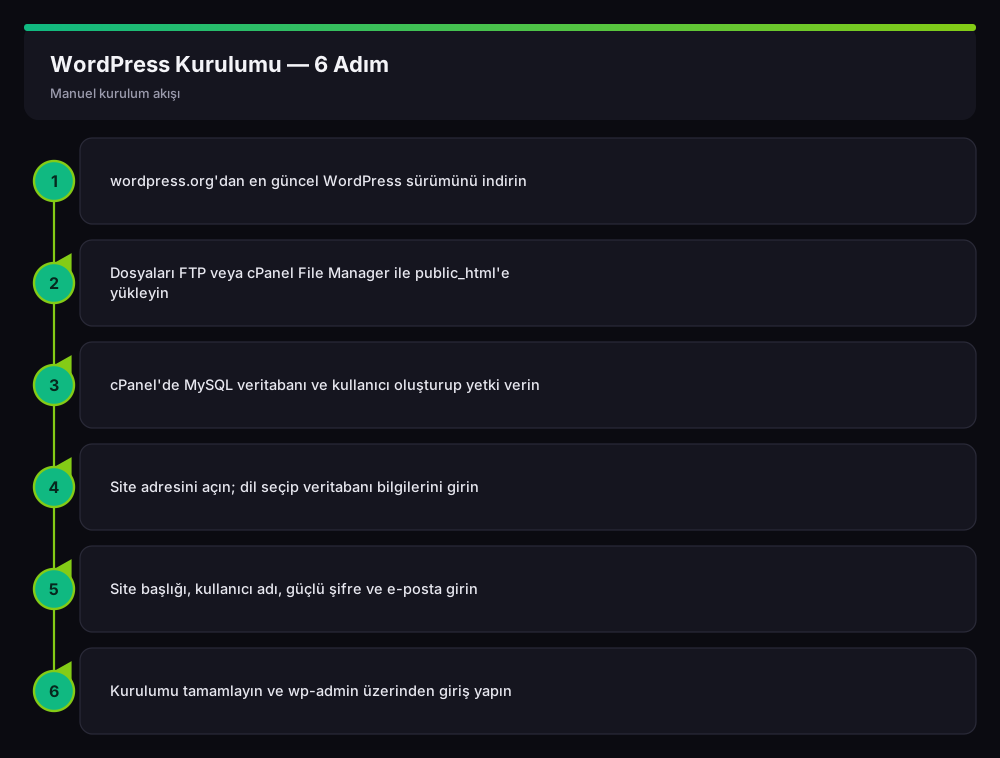
A manual WordPress installation consists of six steps. Take a look at this flow first, then we'll go through each step one by one:
Step 1: Download WordPress
Download the latest WordPress version as a .zip from wordpress.org/download. Always installing with the newest version is important for security and compatibility.
Step 2: Upload the Files to public_html
You can upload the zip file you downloaded in two ways:
- Using the cPanel File Manager: Go into the
public_htmlfolder, upload the zip and extract it with Extract. Make sure the WordPress files sit directly inside public_html (there should be no extrawordpressfolder left inside). - Using FTP: Unzip the file on your computer and upload its contents to public_html with FileZilla.
If your site address will be directly yoursite.com, the files must be inside public_html. If the files stay inside public_html/wordpress/, your site will open at yoursite.com/wordpress.
Step 3: Create a Database in cPanel
WordPress stores its content in a MySQL database. In cPanel, go to the MySQL Databases section and perform three actions in order:
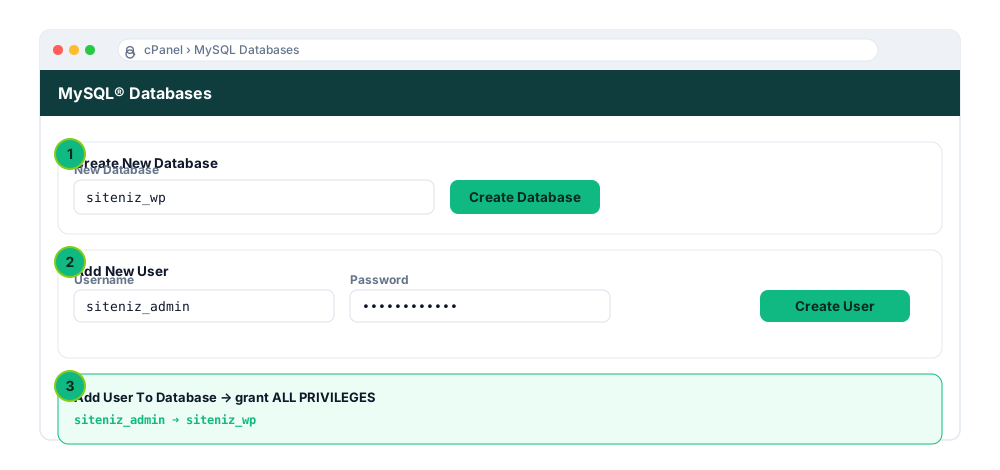
- Create a database: For example
yoursite_wp. Note down the full name (a prefix is usually added). - Add a user: Set a username and a strong password; note down both.
- Add the user to the database: Connect them by granting ALL PRIVILEGES.
Step 4: Choose a Language and Enter the Database Details
Open your site address in a browser. The WordPress setup wizard starts; first you choose the language, then it asks for the database connection details. Enter the values you just created:
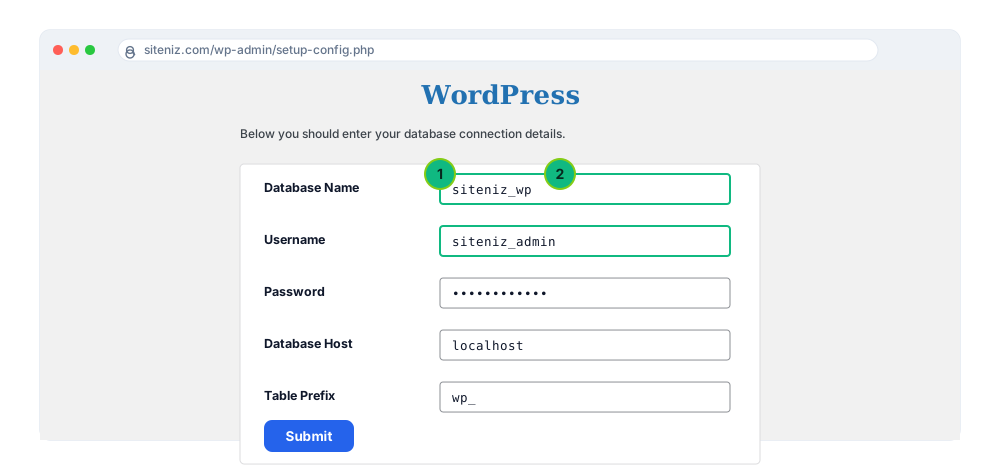
- Database Name: The full name of the database you created (e.g.
yoursite_wp). - Username / Password: The database user and password.
- Database Host: On shared hosting this is usually
localhost. - Table Prefix: For security you can use a prefix other than the default
wp_(e.g.wpx_).
If these details are correct, WordPress automatically creates the wp-config.php file. If there is a permission issue, you may be asked to manually save the displayed content as wp-config.php and upload it to public_html.
Step 5: The Famous 5-Minute Install
If the database connection is successful, the final screen appears. Here you enter your site's basic information:
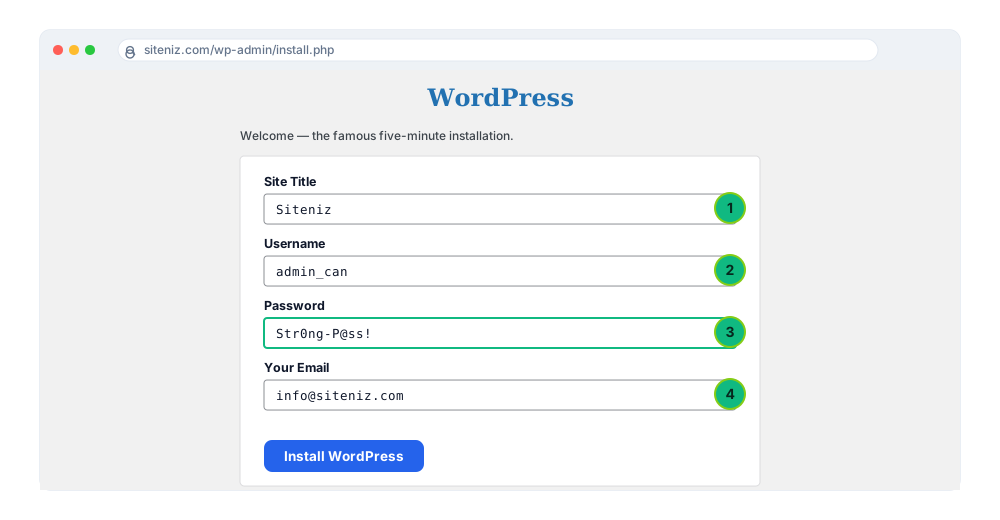
- Site Title: The name of your site (can be changed later).
- Username: Avoid predictable names like
admin. - Password: Set a strong, unique password.
- Email: A valid address for password resets and notifications.
Click the Install WordPress button. The installation finishes within a few seconds.
Step 6: Log In to the Admin Panel
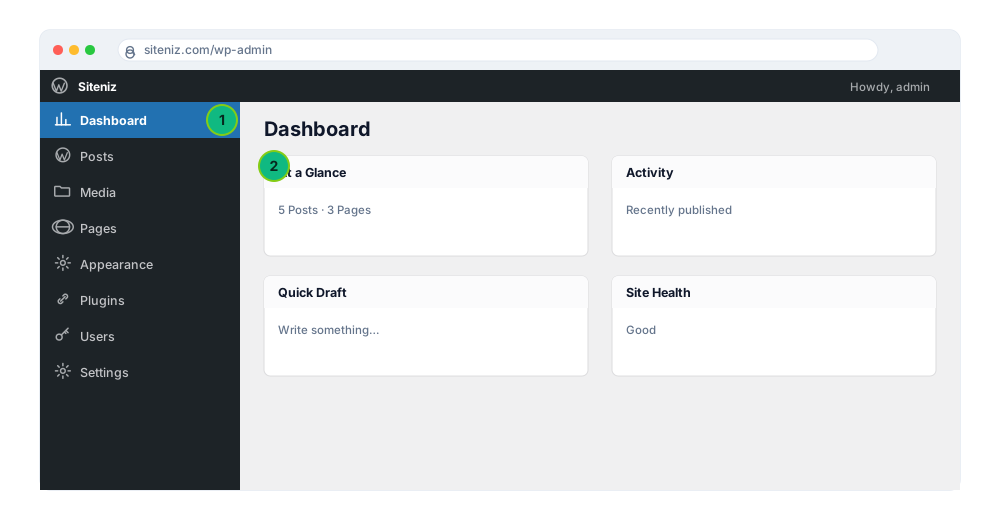
You can now log in at yoursite.com/wp-admin with your username and password. The WordPress admin panel (dashboard) appears:
First Things to Do After Installation
- Permalinks: Under Settings > Permalinks, choose the "Post name" structure (SEO friendly).
- SSL/HTTPS: Install a free SSL from cPanel and switch your site address to https.
- Delete unnecessary content: Remove the sample post, page and comment.
- Essential plugins: Install caching, security and an SEO plugin.
- Backups: Set up a solution that takes automatic backups.
If you ran into an issue during installation such as an "error establishing a database connection," a white screen, or a 404, check out our common WordPress installation errors and solutions article for detailed fixes.
Frequently Asked Questions (FAQ)
How long does a WordPress installation take?
Once the files are uploaded and the database is ready, the actual installation really does take just a few minutes; that's why it's called the "5-minute install."
What is the difference between a one-click install (Softaculous) and a manual install?
Tools like Softaculous do all the steps automatically; they're fast, but knowing the manual installation is useful for learning what's happening and for troubleshooting.
What should I enter as the database host?
On most shared hosting, 'localhost' is the correct value. Some providers give a different host name; if you're not sure, ask your hosting company.
What is wp-config.php?
It is the configuration file where WordPress keeps its database details and core settings. It is created automatically during installation and sits inside public_html.
Conclusion
A WordPress installation comes down to six steps: download, upload, create a database, enter the connection details, complete the 5-minute install and log in. When you follow the steps in order, the installation goes smoothly. And if you hit a snag, our installation errors guide has you covered.
Related Guides
- The Most Common WordPress Installation Errors and Their Solutions
- What Is cPanel and How Do You Use It? (Beginner's Guide)
- What Is FTP and How Do You Use It? (Detailed Guide with FileZilla)
Need help with your website, hosting or SEO? Get in touch with me.